To transfer leads from the Website made on Wix to your CRM system, you need to go through 3 configuration steps on the LeadBox side and on the Wix side.
STEP 1: Connect Wix to LeadBox.
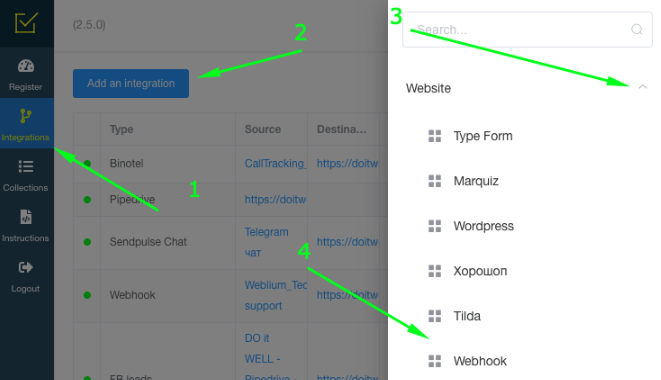
- Go to the integration section
- Click “Add Integration”
- From the list of integrations that appears, select "Website" → Webhook
- Write down the name of the integration (so that you can then understand what is which of the connected integrations
STEP 2: Connect LeadBox on Wix side
To do this, we use Wix instruction for sending data to WebHook.
After setting up according to this instruction send a test lead from the Website.
Briefly according to the instructions, the sequence of steps is as follows:
- Go to Automations in your site's dashboard.
- Click + New Automation in the top right corner.
- Click + Start from Scratch or choose a suggested automation.
- Click the title to give your automation a name.
- Select a trigger for your automation.
- Choose Send via webhook as your automation's action.
- Enter the URL from LeadBox integration page.
STEP 3: Configuring Wix on the LeadBox side:
Go to the created integration page. And go through the settings on it.
- Connection to - select in this field the CRM to which applications will be sent. CRM must be pre-connected
- Field mapping.
In the field mapping block, the column on the left "Parameter key" is responsible for the data that will be filled in CRM. And the column on the right "Parameter value" is for selecting data getting from Webhook.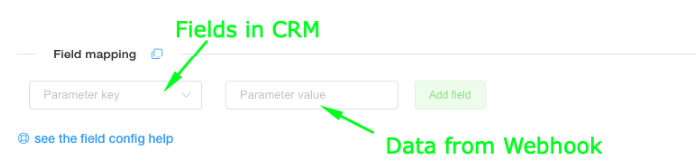
The data put in the "Parameter value" (data received from Webhook) is taken from the first test lead that should be sent after connecting Webhook. You will find this data in the Register section of LeadBox. Depending on the fields of your form, you will receive the appropriate data set.
Read more about field mapping here It should look like this if the form contains only the name / phone number and email fields (and we compare only the fields related to traffic sources and the name of the deal and the stage of Pipeline). The name of the deal is matched without {{}}, in order to pass a constant value: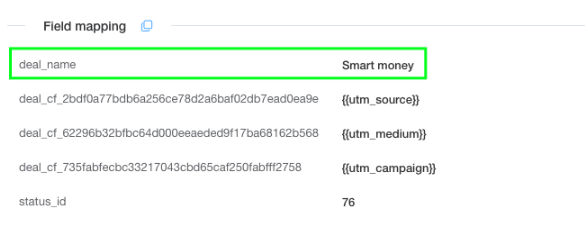
- List of responsible managers.
Settings for distribution of orders from this source among different managers. To configure, select a pre-created collection of managers. Use it if no responsible manager is configured in field mapping block.
- Integration rules.
In the standard setting, LeadBox checks the presence of a contact and an active deal in the CRM. If there are both of them - it puts the task on the responsible user in the deal. If there is a contact only (without deal), LeadBox creates a deal assigned to the responsible manager from the existing contact. If there is neither a contact nor a deal, LeadBox will create both for the responsible user selected in the distribution settings.
This algorithm can be supplemented with settings from the blocks below:
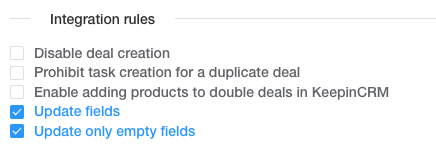
- Disable deal creation - if activated, LeadBox will not create a deal even if there is neither a contact nor a deal in CRM. Only update data in existing deal / contact;
- Prohibit task creation for a duplicate deal - if activated, LeadBox will not create a task for the responsible user if there is a new active deal for the same contact;
- Update fields - if activated, LeadBox will update all fields in the contact and already existing active deal according to the data transferred from the new lead.
- Update only empty fields - will update only those fields that were empty in the contact / deal with new information from the lead (for example information about Traffic Source).
Information about the features of choosing integration rules for data transfer to KeepinCRM is here
- Filter setting
Setting the filter is necessary if you do not need all the leads from this connection in your CRM system.
Additional, you can read about filter settings here
- Unification of the phone.
In the standardization of the phone number, the format of the Ukrainian number is a priori selected, but it is possible to insert another code and change the check of the number of characters in the phone number for leads from another country. Standardization is configured for only one format. So if you have different countries, it is better to make different lead forms for them and set the necessary number settings in each of them separately.