The connection of Type Form takes place with settings on the LeadBox side and settings on the side of the Type Forms themselves. Such a connection can be divided into several steps.
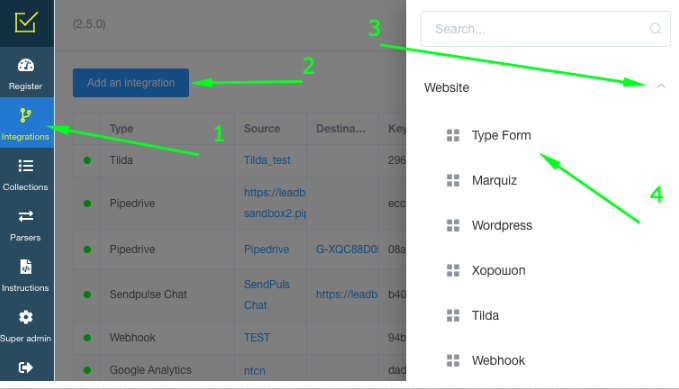
STEP 1: Connecting Type Form to LeadBox.
- Go to the integration section
- Click “Add Integration”
- From the list of integrations that appears, select "Web site" and click on Type Form
- Write down the name of the integration (so that you can then understand what is which of the connected integrations)
STEP 2: Connecting the LeadBox on the Type Form side
For this, we use the instructions of the Type Form service for sending data to WebHook. Start with the Setup guide.
After setting up, send a test application with Type Form.
STEP 3: Setting the Type Form on the LeadBox side:
Go to the created integration and go through the settings:
- Connection to - select in this field the CRM to which applications will be sent. CRM must be pre-connected
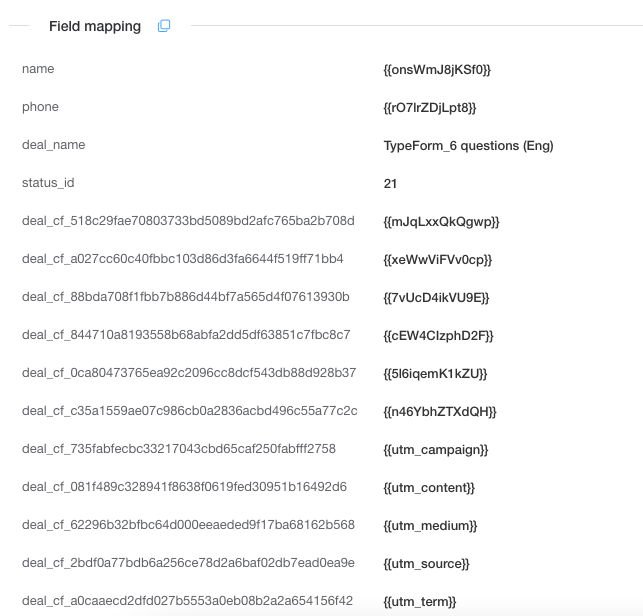
- Field mapping.
In the field mapping block, the column on the left "Parameter key" is responsible for the data that will be filled in CRM. And the column on the right "Parameter value" is for selecting data getting from Type Form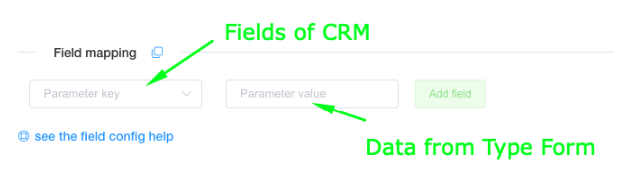
The data put in the "Parameter value" (data received from Type Form) is taken from the first test lead that should be sent after connecting Type Form. You will find this data in the Register section of LeadBox. Open the data of such a lead in the Register and switch the display to JSON parse: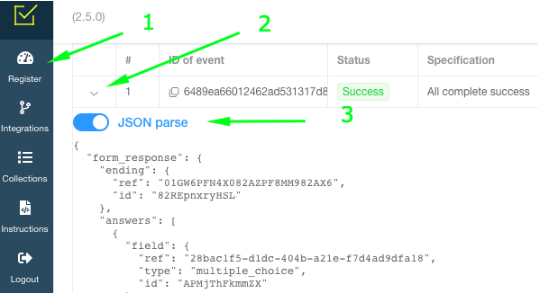
Data from Type Form consists of three parts:
Part 1 - answers on the quiz of Type Form including contact details of the person who left the answers. They are at the beginning of the JSON array and start from the sign "answers":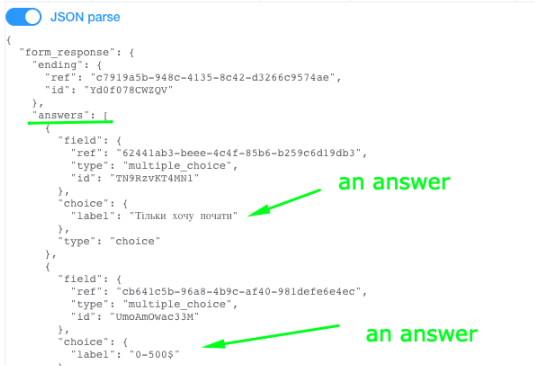
Actually you do not work with this part of data.
Part 2 - the questions and the options of answering questions. That is a block of data you will use for searching of ID of questions using for the left part of mapping fields. Focus on the text of the question, it is present in the JSON array of data. The block with questions starts by the word "fields"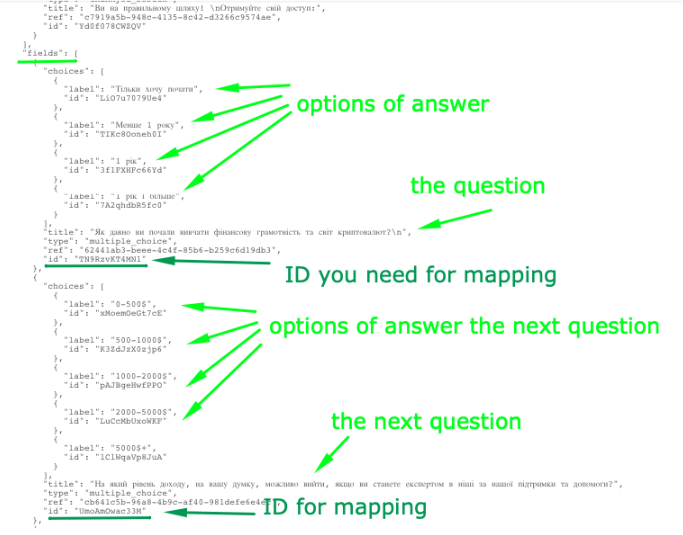
After a list of questions and options for answering them you will find fields and ID relating to contact details. You will use them for mapping fields also:
Part 3 - traffic source data (utm tags). They will be at the beginning of the JSON array or at the end depending on the settings of Type Form. Their block starts with the word "hidden":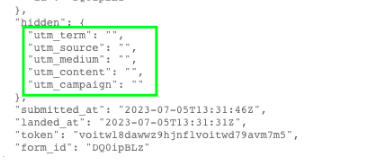
We write them as we see them in the array, but we wrap them in {{}}
- List of responsible managers.
Settings for distribution of orders from this source among different managers. To configure, select a pre-created collection of managers. Use it if no responsible manager is configured in field mapping block.
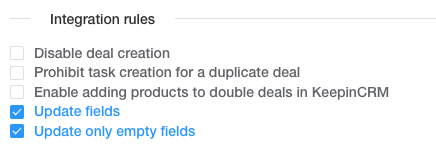
- Integration rules.
In the standard setting, LeadBox checks the presence of a contact and an active deal in the CRM. If there are both of them - it puts the task on the responsible user in the deal. If there is a contact only (without deal), LeadBox creates a deal assigned to the responsible manager from the existing contact. If there is neither a contact nor a deal, LeadBox will create both for the responsible user selected in the distribution settings.
This algorithm can be supplemented with settings from the blocks below:
- Disable deal creation - if activated, LeadBox will not create a deal even if there is neither a contact nor a deal in CRM. Only update data in existing deal / contact;
- Prohibit task creation for a duplicate deal - if activated, LeadBox will not create a task for the responsible user if there is a new active deal for the same contact;
- Update fields - if activated, LeadBox will update all fields in the contact and already existing active deal according to the data transferred from the new lead.
- Update only empty fields - will update only those fields that were empty in the contact / deal with new information from the lead (for example information about Traffic Source).
- Filter setting
Setting the filter is necessary if you do not need all the leads from this connection in your CRM system.
- Unification of the phone.
In the standardization of the phone number, the format of the Ukrainian number is a priori selected, but it is possible to insert another code and change the check of the number of characters in the phone number for leads from another country. Standardization is configured for only one format. So if you have different countries, it is better to make different lead forms for them and set the necessary number settings in each of them separately.