Letter parsing makes it possible to systematize and send data from letters with the same structure to the CRM system.
Most often, this solution is used for marketplaces providing information about companies and their offers of certain markets. Letters with orders or requests from potential clients sent from these platforms must have the same structure and, accordingly, have a single sender - this specialized Website. The letter should contain contact information of the potential client that will be transferred to the CRM.
To set up parsing, you need to go through the following 3 steps:
STEP 1: Create a parser on the Leadbox side.
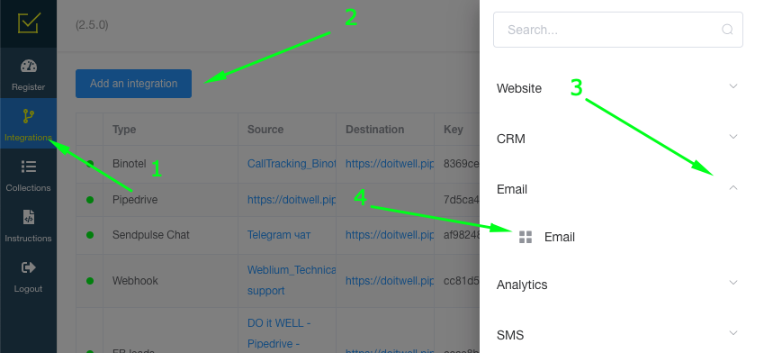
- Go to the integration section
- Click “Add Integration”
- From the list of integrations that appears, select "Email Parsing" and click on Email
- Write down the name of the integration (so that you can then understand what is it in a list of your integrations)
-
On the page of the new integration, we can see the company mail generated by LeadBox to send copies of the necessary letters there. LeadBox will be able to process letters incoming on this email.
At the example below, it is 6cd5ef1a3d8c6fe4bc170b9912d97c14@leadbox.com.ua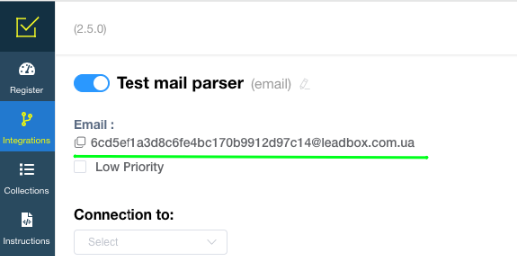
Next step is setting up transfer letters from your email, where orders from the marketplaces are received, to the email generated in LeadBox integration.
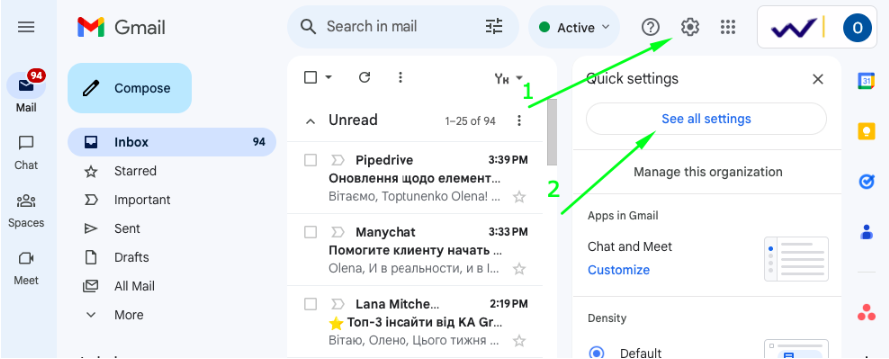
STEP 2: Setting up the forwarding of necessary letters from the client's email to LeadBox (using the example of a Gmail mailbox).
- Go to your mailbox settings
-
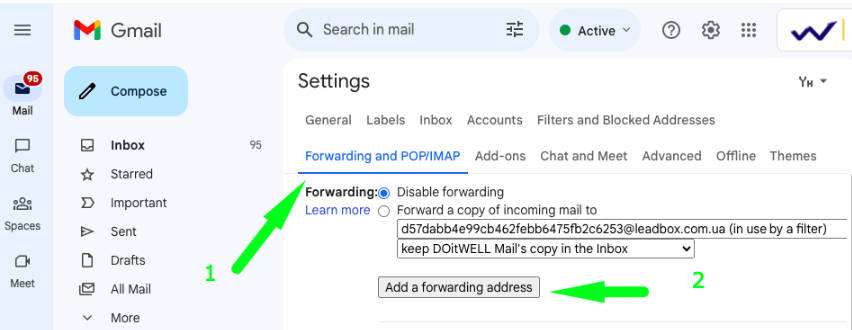
Select "Forwarding and POP/IMAP", click "Add Forwarding Addresses" and add the LeadBox business email you got at the previous step to the list of addresses available for forwarding.
- After adding the address, the mailbox sends a forwarding confirmation request to the parser. You should press “proceed” to confirm it.
-
You can see the confirmation code (or confirmation link) in LeadBox at the Register tab in the first record from the source you havre just connected.
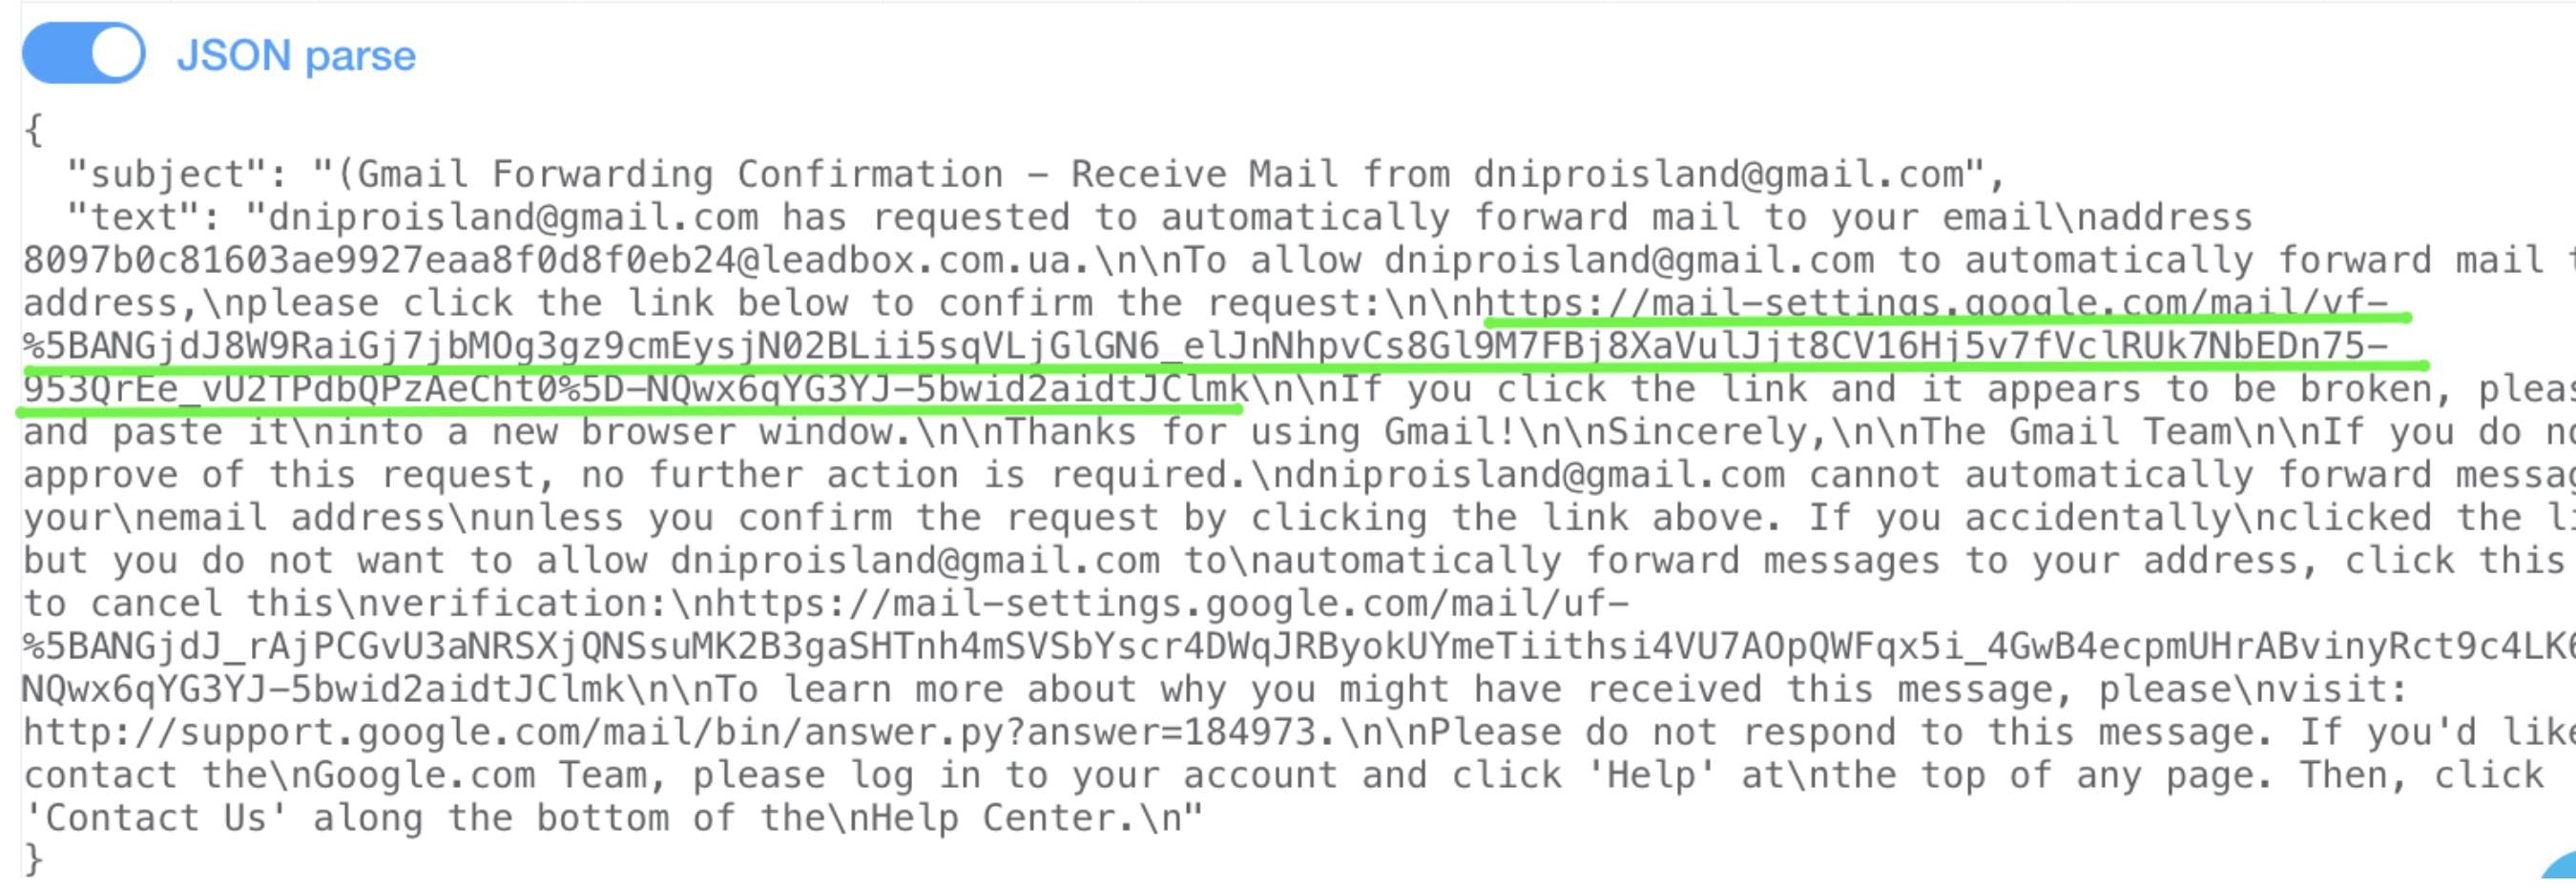
Copy the link (highlighted in green), paste it into the browser and follow it.
Or copy the code and paste it in the confirmation field

- If you got a lot of letters in this email but you need just some of them, you need to configure the filter for specifying letters you need. Go to "Filters and blocked addresses" and click "create a new filter"
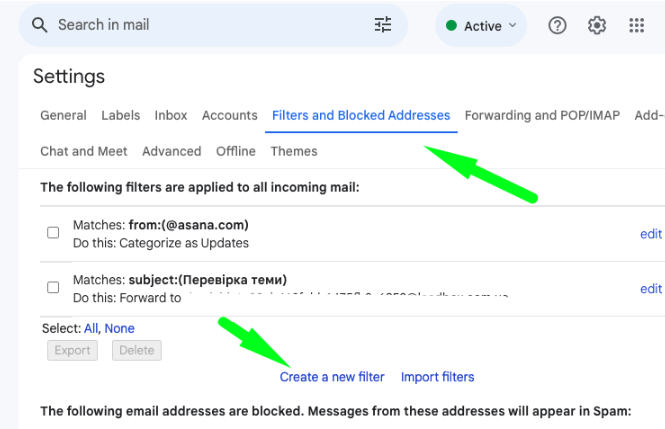
- In the filter you indicate whom you get letters from and with what Header of the letters (if the same service sends you several different types of letters with different structure).

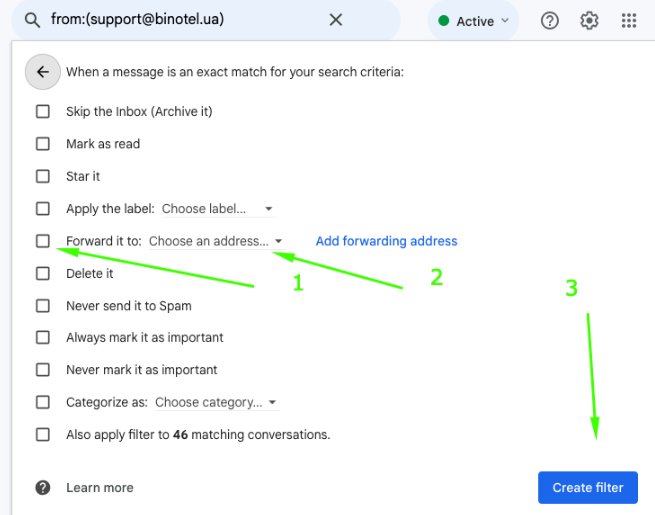
- Check the box “Forward it to” and choose the LeadBox email address. Then click "Create filter"
The setup on the mailbox side is complete.
For this:
1) Admin Console > Menu > Applications > Google Workspace > Gmail.
2) Regulatory Compliance > Content Compliance > Customize.
3) Select Message Types: Inbox and Internal Inbox.
4) In point 2 "Add a condition that will indicate the content to be searched for in each email", click Add.
5) Add the subject of the letter to the Content column.
6) Click Save.
7) Scroll down the page and in the block Other recipients put a check mark > Add > enter the email address to which the letters will be forwarded (the LeadBox address that you copied on the parsing settings page in LeadBox) > Save.
8) Click “Show Options”.
9) In the "Account types" section, check the box next to User.
10) In the "Mailbox filter" section, put a check mark next to Filter only specific recipients and enter the email address to which requests from Web services arrive > Save.
STEP 3: Configure the parser on the LeadBox side
We have to indicate exactly which fields of the letter, to which CRM fields should be transferred. Therefore, we go through the settings of the Parsing integration page.
- Connection to - select in this field the CRM to which applications will be sent. CRM must be pre-connected
- Field mapping and Parser config for EMAIL.
These blocks are tied together. Using Parser config for EMAIL you can make mapping of the text from the letter with the fields of your CRM.
First, copy the text of the letter from the test lead sent by you in advance. The test lead will appear on the "Register" page.
In the "Registry", you click on the JSON display and copy everything after text (but without “ ”, only text).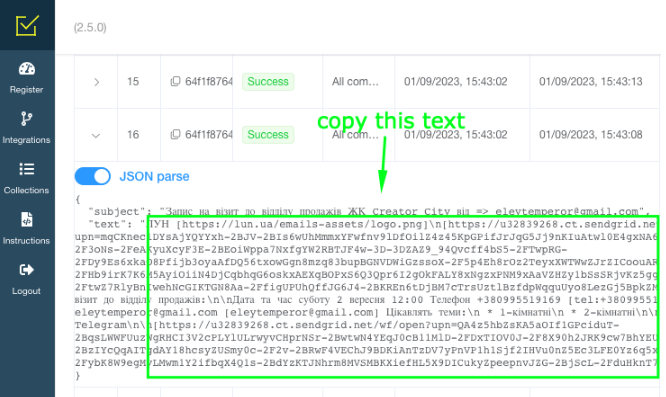
Paste the copied text into the Parser config for EMAIL field. LeadBox will scatter the data in the block to the right of the field where you copied the text. And then you can compare. Click on the word from the right column and it will be displayed with a digital code in the field opposite the Parameter key. Select the parameter key from the list (the name of the field of the CRM system in which you need to enter the selected text of the letter):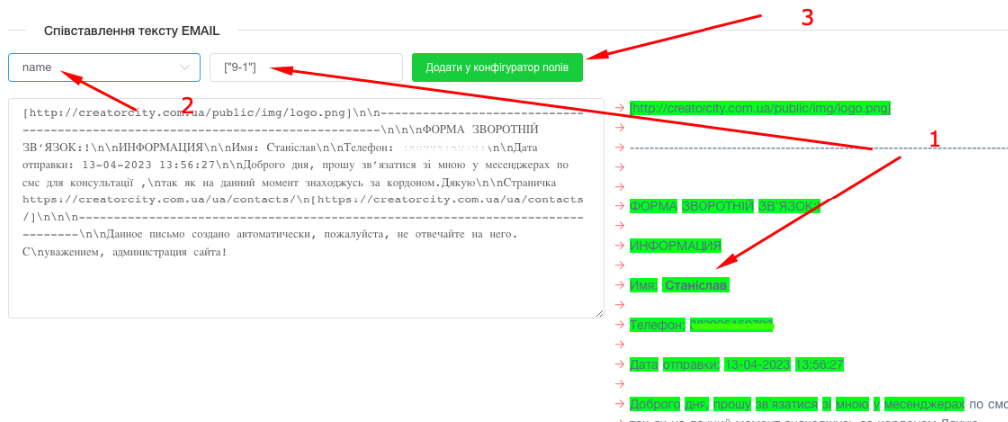
Check all the added data in the Field Mapping block. It should look like this but with your own numbers at the right column:
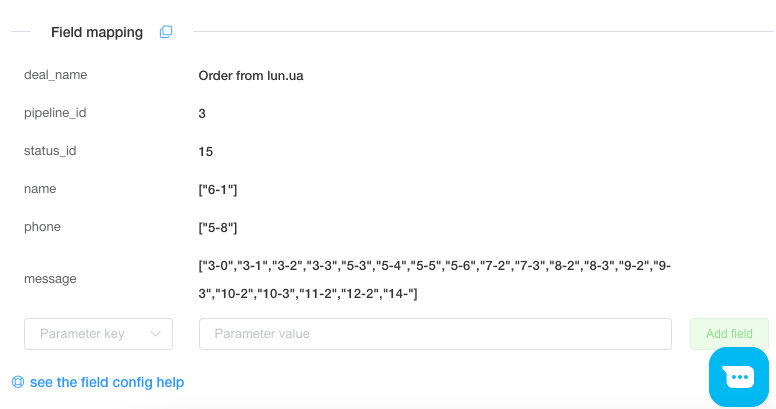
Additionally, you can add deal_name (the name of the deal in CRM) - from the subject of the letter. For this, we write {{subject}} in the field “Parameter value”.
And you can also add the stage of the sales pipeline, where this deal should be created. To do this, select the parameter key status_id already in the "Field Mapping" block and insert the status ID from the CRM system.
If you have a custom field in the CRM Dela / Contact, then we can add a certain value from the letter to it using the deal_cf_XXXXXXX or contact_cf_XXXXXXX parameter key, respectively. Where XXXXXXXXX is the Api Key of the CRM field.How to search for the status ID and API Key of a field, and about the general principle of fields mapping, read here. - List of responsible managers.
Settings for distribution of orders from this source among different managers. To configure, select a pre-created collection of managers. Use it if no responsible manager is configured in the field mapping block.
- Integration rules.
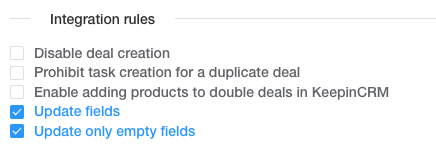
In the standard setting, LeadBox checks the presence of a contact and an active deal in the CRM. If there are both of them - it puts the task on the responsible user in the deal. If there is a contact only (without deal), LeadBox creates a deal assigned to the responsible manager from the existing contact. If there is neither a contact nor a deal, LeadBox will create both for the responsible user selected in the distribution settings.
This algorithm can be supplemented with settings from the blocks below:
- Disable deal creation - if activated, LeadBox will not create a deal even if there is neither a contact nor a deal in CRM. Only update data in existing deal / contact;
- Prohibit task creation for a duplicate deal - if activated, LeadBox will not create a task for the responsible user if there is a new active deal for the same contact;
- Update fields - if activated, LeadBox will update all fields in the contact and already existing active deal according to the data transferred from the new lead.
- Update only empty fields - will update only those fields that were empty in the contact / deal with new information from the lead (for example information about Traffic Source).
- Filter setting
Setting the filter is necessary if you do not need all the leads from this connection in your CRM system.
- Unification of the phone
In the standardization of the phone number, the format of the Ukrainian number is a priori selected, but it is possible to insert another code and change the check of the number of characters in the phone number for leads from another country. Standardization is configured for only one format. So if you have different countries, it is better to make different lead forms for them and set the necessary number settings in each of them separately.