To connect the Facebook Lead Form, it is necessary to activate in LeadBox the Facebook user account of the administrator of the advertising cabinet with the required page/pages. You need to do this once and then you can connect the required FB pages and forms, both old and those that will be added later through an already authorized FB administrator in the LeadBox account.
Therefore, the setting takes place in several steps.
STEP 1: Login to Facebook through LeadBox.
You need a Facebook user account that has admin access to the desired page and advertising cabinet. You sign in to the Facebook admin account and enters the LeadBox account.
Further:
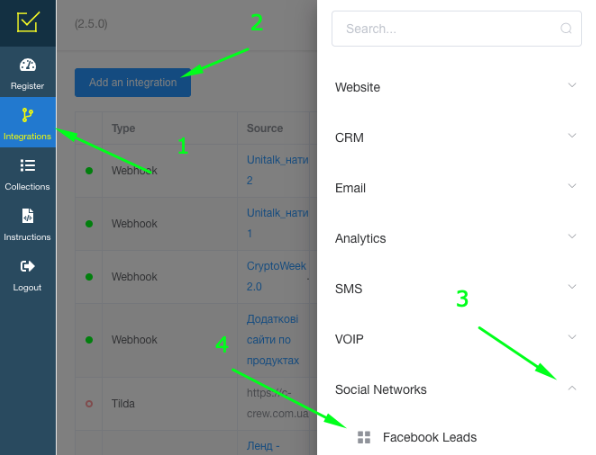
- In LeadBox, you need to go to the integration section;
- Click "Add integration";
- From the list of integrations that appears, select "Social networks" → Facebook Leads
- Next, you need to select “Connect Facebook” → LeadBox will offer to continue under the authorized account or choose another one. Continue if the account is valid.
Now on the LeadBox page with Facebook Lead integration, you will have a fixed connection with the account or accounts, in which you can choose the forms to connect.
If necessary, access to the Facebook administrator account can be removed.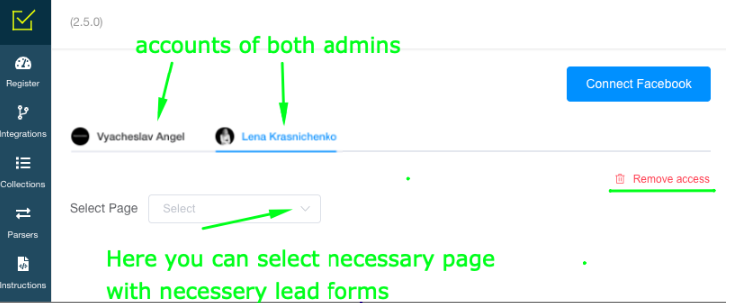
STEP 2. Connecting specific LeadForms to LeadBox.
For this you need:
1) Go to the connection page of the Facebook Leads integration (where you can see the connected administrator account);
2) Click on the required admin;
3) Select the required page in the field that appears;
4) Select the required form in the next field that appears;
5) Check visually that this is the required form and that it has the necessary fields and click on "Add form"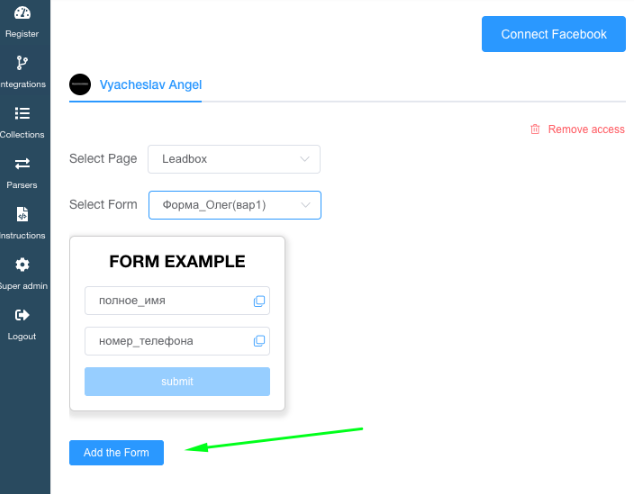
STEP 3: Setup transfer of information to CRM on LeadBox side.
To configure that, we go through all the points on the configuration page of the created integration.
- Connection to - select in this field the CRM to which applications will be sent. CRM must be pre-connected
- Field mapping.
In the field mapping block, the column on the left "Parameter key" is responsible for the data that will be filled in CRM. And the column on the right "Parameter value" is for selecting data getting from Facebook Lead Form.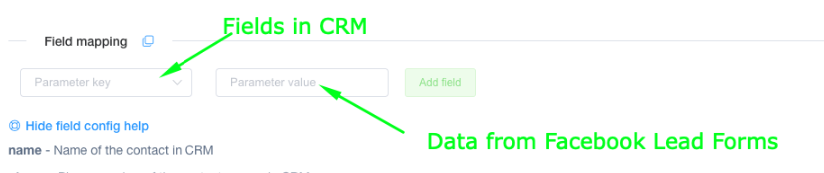
The list of the data in the left column (which is responsible for the fields in CRM) can be seen by clicking on "Parameter key". The meaning of these parameters is provided in the tooltip below "see the field config help"
The right column of data can either be written by hand if it should be a constant value, such as for deal name / manager ID / status ID
Or put in it values from the fields of the Form Example. To make this, click the copy icon next to the field in Form Example and insert it into the field matching block: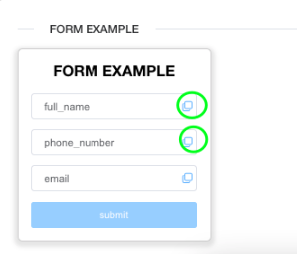
You should have a filled block like this: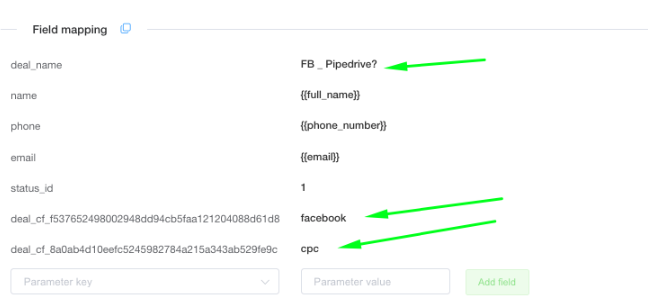
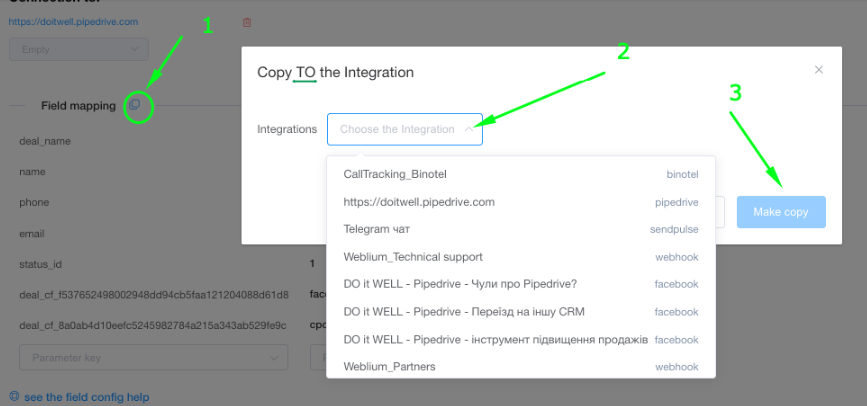
you can use the field mapping setup of the one lead form to set up other lead forms, simply by copying the data of the field mapping block.
1) click on the copy icon next to the inscription Field mapping
2) choose a pre-created form INTO which we copy these settings
3) confirm copying
- List of responsible managers.
Settings for distribution of orders from this source among different managers. To configure, select a pre-created collection of managers. Use it if no responsible manager is configured in field mapping block.
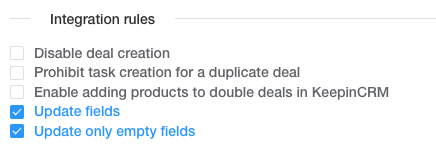
- Integration rules.
In the standard setting, LeadBox checks the presence of a contact and an active deal in the CRM. If there are both of them - it puts the task on the responsible user in the deal. If there is a contact only (without deal), LeadBox creates a deal assigned to the responsible manager from the existing contact. If there is neither a contact nor a deal, LeadBox will create both for the responsible user selected in the distribution settings.
This algorithm can be supplemented with settings from the blocks below:
- Disable deal creation - if activated, LeadBox will not create a deal even if there is neither a contact nor a deal in CRM. Only update data in existing deal / contact;
- Prohibit task creation for a duplicate deal - if activated, LeadBox will not create a task for the responsible user if there is a new active deal for the same contact;
- Update fields - if activated, LeadBox will update all fields in the contact and already existing active deal according to the data transferred from the new lead.
- Update only empty fields - will update only those fields that were empty in the contact / deal with new information from the lead (for example information about Traffic Source).
- Filter setting
Setting the filter is necessary if you do not need all the leads from this connection in your CRM system.
- Unification of the phone.
In the standardization of the phone number, the format of the Ukrainian number is a priori selected, but it is possible to insert another code and change the check of the number of characters in the phone number for leads from another country. Standardization is configured for only one format. So if you have different countries, it is better to make different lead forms for them and set the necessary number settings in each of them separately.