To connect forms from your Wordpress site, you need to go through 4 steps.
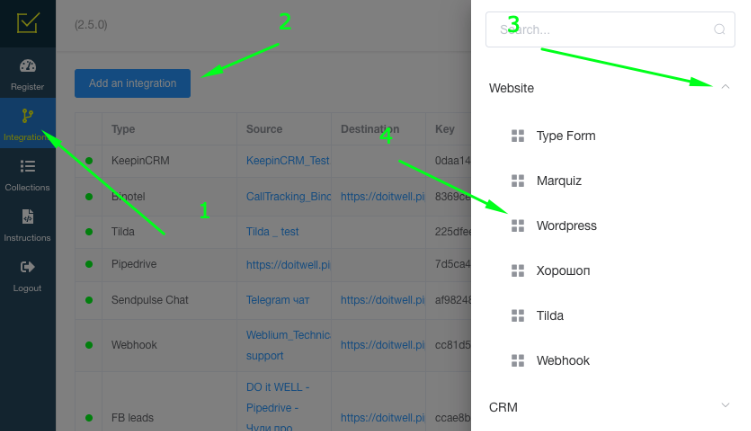
STEP 1: Create an integration with Wordpress on the LeadBox side. For this you need:
- Go to the integration section,
- Click “Add Integration”,
- From the list of integrations that appears, select "Web site" and click on Wordpress,
- Write down the name of the integration (so that you can then understand what is which of the connected integrations)
STEP 2: Connecting LeadBox on the Wordpress side
After you've created the integration, you'll be taken to the settings page and under the name of the integration you'll see webhook. It must be connected to all forms on your site.
If you have a programmer maintaining your site, then you give him the instructions below:
Data transfer method: POST
Data format: JSON
Example of data transfer:
{
“name”: “John”,
“phone”: “(099) 123-45-67”,
“email”: “test@gmail.com”,
“order_number”: “2345”,
“utm_source”: “google”,
“utm_medium”: “cpc”
}
If you don't have such a programmer and you work with your Web site yourself, then let's take a look at the example of connecting LeadBox with Contact Form 7 in Wordpress:
1) Log in to the site admin panel and go to the form settings.
2) Select the "API Integration" item and insert a webhook in it, check the data transfer method (it should be the same as on the screen) and insert the values of the form fields: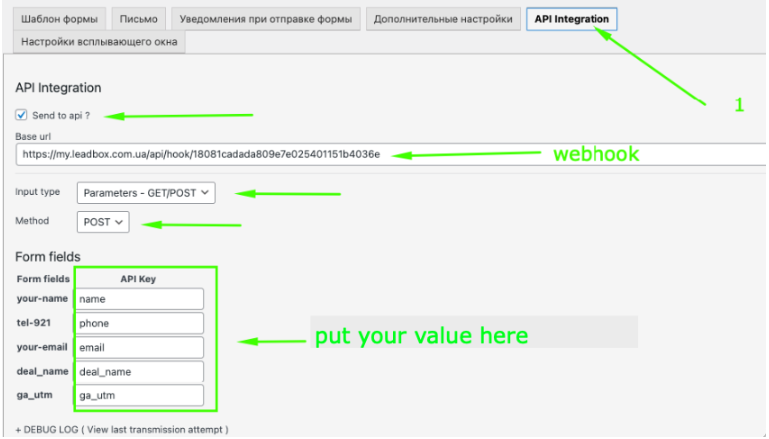
Accordingly, the field transmitting the name should have the value - name; phone - phone; mail - email.
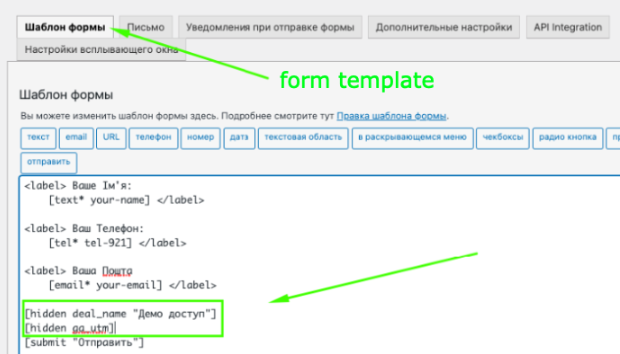
To create hidden fields, go to the “Form Template” tab and add all the necessary fields in the following format: [hidden parameter “parameter value”]. Each field must be on a new line and in [ ]
[hidden deal_name "Demo access"] → then I will be able to transfer the exact value "Demo access" to the CRM field.
[hidden ga_utm] → parameter value is not required here.
If you have added everything correctly, then in the API Integration tab you have additional fields that were not there before. Now you can also put the appropriate API Key in them using the example from the previous screenshot.
STEP 3: Install the application script on the site
To fill in the field with the ga_utm parameter, you need to install the LeadBox application script through Google tag manager.
For this:
→ Go to Google Tag Manager
→ Select "New Tag" on the Overview page
→ Click on the pencil in the tag configuration block
→ Select the tag type "Custom HTML"
→ Insert the LeadBox script into the HTML field
(function() { var s = document.createElement('script'); s.type = 'text/javascript'; s.charset = 'utf-8'; s.async = true; s.src = '//widget.leadbox.com.ua/[G-XXXXXXXXXX]'; var ss = document.getElementsByTagName('script')[0]; ss.parentNode.insertBefore(s, ss);} )();
[ G-XXXXXXXXXX ] - should be replaced with your GA4 Measurement ID.
→ In the triggers, select All pages
→ Save with a name you understand
→ Send for "publication"
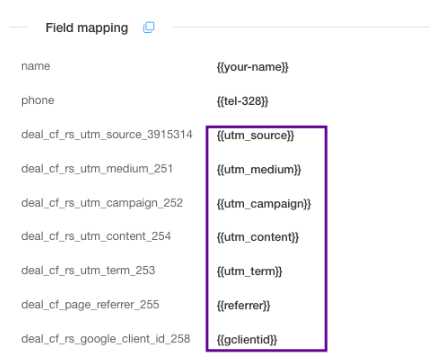
Where {{referrer}} is the webpage where the form was filled out. {{gclientid}} - Google Client ID.
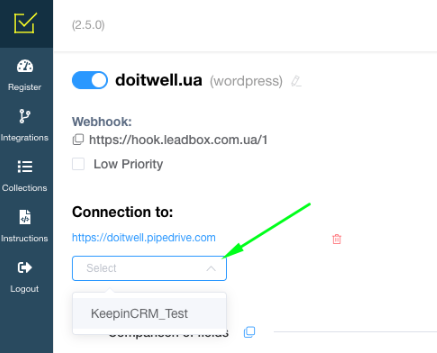
STEP 4: Setting up Wordpress integration on the LeadBox side
Once you've created the integration, you'll be presented with a settings page. To configure it, go through all the items on the page that opens one by one.
- Connection to - here you can choose the CRM to which leads will be sent from your web site.
-
Mapping of fields.
In the field mapping block, the column on the left is responsible for selecting the fields in CRM that will be filled. And the column on the right is for data obtained from the site form.
The data we enter in the column on the right (data obtained from Wordpress forms) is taken from the first test lead came from the Web site in the Register section of LeadBox. Open the data of such a lead in the Register and switch the display to JSON view.
Features of mapping fields for data transfer in KeepinCRM - here
- List of responsible managers - settings for distribution of leads from this source among different managers. To configure, select a pre-created collection of managers.
- Integration rules.
In the standard setting, LeadBox checks the presence of a contact in the CRM (by phone number and email) and the presence of an active deal. If there are such, it updates the data of the active deal and assigns the task to the responsible person. If there is none, then it creates either only an agreement to the existing contact, or both the contact and the agreement.
If this format is suitable, then this section should not be changed, but if a different algorithm is needed, you can check the appropriate boxes:
"Disable creating deals" - will not create a deal even if there is no contact or deal in CRM. Only update data in existing deals / contact.
"Prohibit creating a task for a duplicate deal" - is used for integrations that need only to update data in existing in CRM deals/contacts. For example it is used for integration with Binotel call tracking or integration which send data from auto-dialers. Excludes the creation of any tasks for additional customer orders.
"Enable adding products to double deals in KeepinCRM" - if you want that the new order of the same client was added to the active deal in KeepinCRM and the new product from this new order also was added to the block Products in already existing deal, then this item should be activated.
"Update fields" - update the fields in the contact and already existing active deal according to those transferred from this lead form
"Update only empty fields" - update only those fields that were empty in already existing contact and active deal (for example, Source or email)
Information about the features of choosing integration rules for data transfer to KeepinCRM is here
- Number standardization.
Activate it only if you understand that those who will fill out the form will be representatives of the same country, so the country code and number length will be the same for them.
After activation, enter the appropriate values: country phone code, number length and a certain example number and look at the result of processing the example.
If you can have users from different countries on the site, it is better to make different pages for them or not to enable number standardization.